Terrain Former v1.6/v1.7 Documentation
Introduction
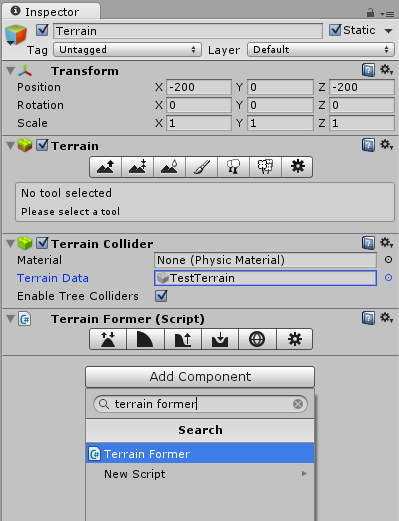
To begin using Terrain Former, add the Terrain Former component onto a terrain object. You can do this by clicking the Add Component button in the inspector window, typing "Terrain Former", then pressing Enter.
Unity's terrain editor sculpts/paints on the exact area the cursor is hovering over. This causes the following issues:
- The area being painted on is based on where the camera is facing. Meaning that painting in the same area will grow the terrain towards the camera.
- It's necessary to paint from a top-down view to paint over bumps which would otherwise be occluded.
In Terrain Former, the way terrain is painted can be changed by switching the Sculpt Onto setting from "Terrain" to "Plane" in the Terrain Former tab in the Unity Preferences window. Rather than raycasting and using the point on the terrain that was hit—like Unity—Terrain Former will, with the "Plane" setting set, raycast onto an imaginary plane. This means that bumps, hills, and mountains do not affect terrain painting. The height of the virtual plane is determined by the point on the terrain when the cursor is left-clicked at.
Known Issues
All versions- Sculpting and texture painting on detailed terrains (like those with a heightmap resolution of 2049 or higher) can be incredibly slow when trying to affect large areas at once. The only way to make this truly quicker would be to completely rework the terrain system - which unfortunately is out of scope for Terrain Former.
- Sculpting in one place using custom, image-based brushes results in a strange, bumpy topology. This is likely down to the lack of bit-depth with textures. Further research needs to be done.
- Sometimes attempting to sculpt doesn't work, this is a bug where Unity isn't building collision meshes for Terrains in certain LOD sets or something. To fix this, zoom in to the area you want to start sculpting. Also try decresing the "Pixel Error" in the settings tab temporarily.
- Editing large terrain grids can cause very poor performance, can lead to memory usage issues, and can overload Unity's "undo" system. Unfortunately all of these issues are hinged mostly on Unity's terrain system. A very lot of work will have to be done to make massive (for a very large open world game) terrain grids 100% usable.
- Unity 5.0.0 might have inferior texture painting performance due to the fact that the "undo"/"redo" system relies on reflection since the splatTextures property is internal in this version of Unity.
- Unity 5.2.x and older might be slow when changing the properties, such as the terrain width or height because these versions of Unity don't have a DelayedIntField, nor a DelayedFloatField built-in.
- [Fixed in v1.5] Editing brush falloff can cause very poor performance.
Frequently Asked Questions
There is a script error/exception happening in Terrain Former!
If the error starts out from the Settings.cs file, it's likely there's something wrong with your Settings.tf file. If that's the case then try looking for anything malformed in the JSON-based Settings.tf file. If that doesn't help you or isn't the problem you're experiencing at all, contact me here.
Help! All my brushes are invisible/pure black!
It's very likely that this is caused by a crazy falloff curve. Change the falloff to a preset and it should be fixed.
Can Terrain Former be used to add vegetation?
Not at the moment; however, it is part of the Roadmap.
Can Terrain Former be used to paint textures onto the terrain?
Yes, in v1.5 and onwards.
What are the requirements for custom brushes?
There aren't any requirements besides that the textures need to be marked as readable/writable—which is done automatically for you—and that brushes are a square—of equal width and height. Here are some best practices alongside the requirements:
- Images should be at least 512x512px.
- Images shouldn't be compressed with loss of quality. (Avoid JPEGs for example. Use PNGs or something else that's losslessly compressed or simply uncompressed.)
Why is sculpting performance slow?
Updating the terrain heights in Unity has a cost that can’t necessarily be avoided. A large area that has been updated in one brush stroke causes an increased cost beyond just sculpting a small area. Generally, most of the time spent sculpting terrain will be in fine details—where it should have good performance—while sculpting large amounts of terrain (eg, half the area of the terrain) will usually be done rarely—meaning most of the time, the overhead should be negligible. If you don’t experience any speediness at all, contact me here.
Terrain Former calculates the brushes' samples only when a property has been changed. This operation can be very slow when working with very large brushes due to the fact that Terrain Former is currently running all on the main thread.
What is the Settings.tf file? Can I ignore it in my subversion control system?
The Settings.tf file stores all of the settings for Terrain Former which is specific to a given Unity project. The Settings.tf file can safely be ignored in version control.
Why aren’t the shortcuts saved in the Settings.tf file?
Shortcuts shouldn't change per project; they simply should be set to whatever the user feels comfortable with. As such they are stored per computer.
Terrain Duplication
When you want to copy over your terrain's settings to start work on a new terrain, simply duplicating the terrain asset will not duplicate the terrain cleanly. It will instead reference the duplicated terrain and will mirror any changes between the original and cloned terrain object. There is a utility to duplicate terrain cleanly that is included in Terrain Former, it is located in Assets > Duplicate Terrain.
Tools
General Settings
Brush Size
Sets the size of the brush, expressed in Unity's world units.
Brush Speed
Sets how quickly the brush will be applied, depending on the tool.
Falloff
Sets the brush's shape. The default shape is designed to appear as a hill. The value—or height of the curve in the curve editor—indicates how much the terrain will be affected in that certain area. The left side of the curve indicates the intensity of the outer area of the brush, while the right side indicates the intensity of the inner area of the brush.
Angle
Sets the angle used to rotate the brush.
Invert
Inverts the brush so black becomes clear and clear becomes black (and everything in the middle).
Behaviour
Random Spacing
Spaces the brush splats randomly based on the range chosen. Setting the min. and max. values to the same value will make the spacing a constant distance (not random).
Random Offset
Applies a random offset to the brush in a random direction. The random offset will range from 0 to the value chosen.
Random Rotation
Rotates the brush randomly within the range selected.
Raise/Lower
This tool raises or lowers terrain contained within the brush circle. Holding LMB raises the terrain, holding Shift+LMB lowers the terrain, and holding Ctrl+LMB will interactively raise or lower the terrain.
Smooth
As you might expect, this smooths the terrain area contained within the brush.
Smooth Radius
Sets the number of adjacent terrain segments that are taken into account when smoothing each segment. A higher value will more quickly smooth the area to become almost flat, but it may slow down performance while smoothing.
Smooth All
Smooth Iterations
Sets how many times the entire terrain will be smoothed. (This setting only applies to the Smooth All button).
Set Height
Sets the height of all terrain in the brush area based on the Set Height value. Shift+LMB will sample the height of the terrain the mouse in currently hovering over.
Flatten
Flatten
Flattens terrain in the brush area to the height of the terrain the cursor was initially left-clicked at. It doesn't affect terrain lower than the height that was clicked at.
Bridge
Flattens all terrain in the brush area to the height of the terrain the cursor was left-clicked at. This affects all terrain—both higher and lower than the terrain click height.
Extend
Extends out terrain in the brush area to the height of the terrain the cursor was left-clicked at. This only affects terrain that is lower than the terrain click height.
Paint Texture
Paints the currently selected texture. Add textures by clicking the "+" tabbed to the "Textures" section. All textures added, removed or edited are synced across all terrains in the current terrain grid (if applicable).
Shrink Wrap/Mould
Shrink Wrap/Mould moulds the terrain underneath any arbitrary scene geometry - as long as it has a 3D physics collider attached. Any kind of thing like ramps can be created by creating bespoke meshes in any 3D software and adding them to the current scene.
Raycast Offset
Specifies the number of units to offset the raycast position. This option is useful for make sure the shrink-wrapped terrain doesn't stick out above objects.
Generation Tools
Falloff
The falloff curve will determine how the generate tool shapes the terrain.
Height
The maximum height of the generated terrain (assuming the falloff curve ends at a value of 1.0).
Create Linear Ramp
Generates terrain that follows the curve governed by the falloff curve.
Ramp Axis
Changes the axis of the ramp.
Create Circular Ramp
Generates terrain with the falloff curve applied in a radial fashion. This is useful for starting with mountains; volcanoes; or a small, circular landmass.
Interactive Tools
Every sculpting tool in Terrain Former has an interactive function. For Raise/Lower, the interactive function acts as a "grab" tool. Other tools such as Set Height, Smooth, and Flatten interactively apply the tool to the terrain.
Custom Brushes
It's possible to use virtually an unlimited number of custom brushes in Terrain Former. Place your custom brushes in the location TerrainFormer\Textures\Brushes. Terrain Former only looks at the grayscale representation of the image. Terrain Former will automatically set your texture's settings so they are ready to be used straight away.
Terrain/Terrain Grid Settings
Settings which are not specific to Terrain Former and are instead specific to the current terrain or terrain grid.
Changing any setting in Terrain Former's settings tab will be syncronized over an entire terrain grid (if applicable). Changing these settings with Unity's built-in tools will have the same effect however it won't reflect the changes or a terrain grid.
Terrain Former Preferences button
A shortcut to the Terrain Former specific settings (located in Unity's preferences window).
Size
Terrain Width/Length
Changes the width and length of the current terrain or for each terrain in a terrain grid (if applicable). There isn't really any good reason to ever have a non-rectangular terrain, and even Unity's own terrain tools don't deal with it either.
Terrain Height
Sets the height (or more specifically the maximum height) of the current terrain or each terrain in a terrain grid (if applicable).
Base Terrain
Sets whether or not the base terrain will be rendered.
Pixel Error
Sets the accuracy of the mapping between the terrain maps (heightmap, textures, etc) and the generated terrain. Higher values indicate lower accuracy but lower rendering overhead.
Cast Shadows
Sets wether or not the terrain will cast shadows.
Material Type
Sets the material used to render the terrain. This will affect how the colour channels of a terrain texture are interpreted. See Enabling Textures for details. Available options are:
Built In Standard: This is the PBR (Physically-Based Rendering) material introduced in Unity 5.0. For each splat layer, you can use one texture for albedo and smoothness, one texture for normal, and one scalar value to tweak the metalness. For more information on PBR and the Standard shader, see Standard Shader.
-
Built In Legacy Diffuse: This is the legacy built-in terrain material from Unity 4.x and before. It uses Lambert (diffuse term only) lighting model and has optional normal map support.
-
Built In Legacy Specular: This built-in material uses BlinnPhong (diffuse and specular term) lighting model and has optional normal map support. You can specify the overall specular colour and shininess for the terrain.
-
Custom: Use a custom material of your choice to render the terrain. This material should use a shader that is specialised for terrain rendering (e.g., it should handle texture splatting properly). We suggest you get a look at the source code of our built-in terrain shaders and make modifications on top of them.
Thickness
The thickness of the terrain used for collision detection.
This lets the physics engine know how thick the Terrain is when used with a TerrainCollider. Any other colliders which are no less than thickness units underneath the Terrain will be considered to collide with the terrain and will be moved above the terrain.
Tree and Detail Objects
Sets whether or not trees and detailed objects will be rendered.
Bake Light Probes for Trees
Sets whether or not light probes are baked for trees.
Detail Distance
Sets the distance (from camera) beyond which details will be culled.
Collect Detail Patches
If enabled the detail patches in the Terrain will be removed from memory when not visible. If the property is set to false, the patches are kept in memory until the Terrain object is destroyed or the collectDetailPatches property is set to true. By setting the property to false all the detail patches for a given density will be initialized and kept in memory. Changing the density will recreate the patches.
Detail Density
The number of detail/grass objects in a given unit of area. The value can be set lower to reduce rendering overhead.
Tree Distance
The distance (from camera) beyond which trees will be culled.
Billboard Start
The distance (from camera) at which 3D tree objects will be replaced by billboard images.
Fade Length
Distance over which trees will transition between 3D objects and billboards.
Max. Mesh Trees
The maximum number of visible trees that will be represented as solid 3D meshes. Beyond this limit, trees will be replaced with billboards.
Wind Settings for Grass
Strength
The size of the “ripples” on grassy areas as the wind blows over them.
Speed
The speed of the wind as it blows grass.
Bending
The degree to which grass objects are bent over by the wind.
Tint
Overall color tint applied to grass objects.
Resolution
Heightmap Resolution
Pixel resolution of the terrain’s heightmap (should be a power of two plus one, eg, 513 = 512 + 1).
Alphamap Resolution
Sets the resolution of the \"splatmap\" that controls the blending of the different terrain textures.
Basemap Resolution
Resolution of the composite texture used on the terrain when viewed from a distance greater than the Basemap Distance (see above).
Basemap Distance
Sets the maximum distance at which terrain textures will be displayed at full resolution. Beyond this distance, a lower-resolution composite image will be used for efficiency.
Detail Resolution
Sets the resolution of the map that determines the separate patches of details/grass. Higher resolutions give smaller and more detailed patches.
Detail Resolution per Patch
Sets the length/width of the square of patches rendered with a single draw call.
Also refer to Unity's Terrain Settings manual page since these are the exact settings, just sometimes named more nicely.
Terrain Former Preferences
Accessible via Edit>Preferences or by clicking the "Terrain Former Preferences" button in Terrain Former's settings tab.
General
Sculpt Onto
The method that determines how the cursor will be projected onto the terrain.
- Plane: Sculpting will be projected onto a flat plane that's located where you initially left-clicked at. This allows for easy sculpting where there are lots of bumps that might otherwise occlude the cursor and make it move unwantedly to the terrain bumps.
- Terrain: Sculpting will be projected exactly where the cursor is hovering over the terrain.
Show Sculpting Plane Grid
Sets whether or not a grid will be visible while sculpting terrain. This is useful for gauging the height of the plane that is used for determining where the brush is projected.
Brush Colour
Sets the colour of the brush. (The alpha value is also taken into account.)
Update Terrain LODs
Sets when to update terrain LODs (level-of-details). Depending on your computer, updating terrain LODs "Always" may actually improve performance since it will only render nearer terrain areas at full polygonal resolution (at the cost of updating the terrain LODs).
- Always: Always update the terrain LODs every single frame while sculpting.
- Mouse Up: Only update the terrain LODs when the user has released the left-mouse button (after sculpting).
Invert Brush Textures Globally
Sets wether or not every brush will be inverted - where black will become clear and clear will become black.
User Interface
Always Show Brush Selection
When enabled, instead of having to go into brush selection with a click, the full brush selection grid is available at all times.
Brush Selection Display Type
Sets the fashion in which brushes are displayed.
- Image Only: Brushes are shown all at once but are internally sorted by their type.
- Image with Type Icon: Brushes are shown all at once, are internally sorted by their type and have an icon at the top-right of each other that designates their type.
- Tabbed: Brushes are grouped together by type and it's possible to view specific brush types using the tab navigation.
Brush Preview Size
The size of the brush preview images that are shown in brush selection.
Show Scene View Information
With this enabled, it is possible to select some assorted information to be displayed in the scene view (see the options below). Disabling this option will hide all information in the scene view.
Display Current Tool
Display the currently selected tool.
Display Current Height
Display the height of the terrain point that the mouse/cursor is currently hovering over.
Display Sculpt Onto
Display the mode that is selected for the Sculpt Onto property.
Default Keyboard Shortcuts
| Operation | Shortcut |
|---|---|
| Increment Brush Speed | = |
| Decrement Brush Speed | - |
| Increase Brush Size | ] |
| Decrease Brush Size | [ |
| Rotate Brush Counterclockwise | ' |
| Rotate Brush Clockwise | ; |
| Reset Brush Rotation | 0 |
| Next Brush | P |
| Previous Brush | O |
| Toggle Sculpt Onto Mode | I |
| Select Raise/Lower Tool | Z |
| Select Smooth Tool | X |
| Select Set Height Tool | C |
| Select Flatten Tool | V |
| Select Paint Texture Tool | B |
| Select Generate Tool | N |
| Select Settings Tab | M |
| Flatten All Terrain | Shift+G |
| Interactive Tools (all sculpting tools excluding smoothing) |
If you need any more help, see the Contact page.